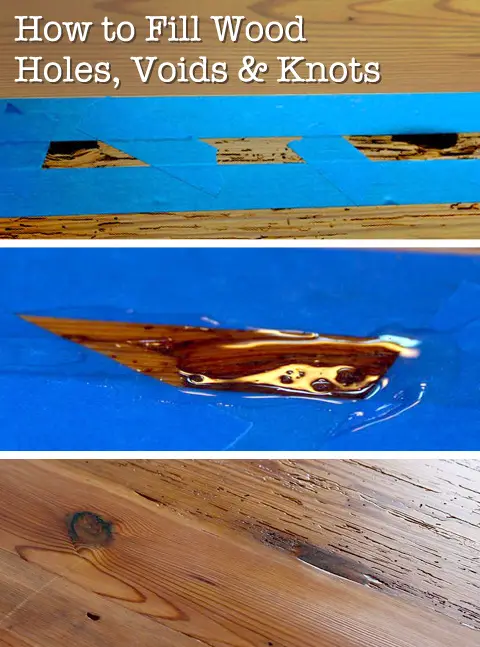
To fill knot holes in wood, begin by taping off the area around the holes with painter’s tape. Then, mix epoxy resin in a small cup or dish and apply it to the knot holes using a scoop.
The epoxy should self-level and fill the holes completely. This method is recommended for larger knot holes, and you can even tint the epoxy to match the color of the wood. Another option is to use wood putty, which should be applied after cleaning the hole and deepening it slightly with a chisel.
These techniques provide efficient and seamless solutions for filling knot holes in woodwork.

Credit: m.youtube.com
Taping Off The Area
To fill knot holes in wood, start by taping off the area around the holes. Press down the edges of the painter’s tape to seal it against the wood. Then, mix up some epoxy resin and scoop it into the knot.
The resin should self-level and fill the hole seamlessly.
Instructions: Properly Tape Off The Area Surrounding The Knot Holes, Voids, Or Knots To Create A Clean Workspace.
To begin the process of filling knot holes in wood, it is crucial to properly tape off the area surrounding the holes, voids, or knots. This step ensures a clean workspace and helps prevent any unwanted epoxy resin from spreading onto the surrounding wood surface.
To tape off the area, follow these instructions:
1. Clean the wood surface: Before applying the painter’s tape, make sure the wood surface is clean and free from any dust, dirt, or debris. Use a damp cloth or mild cleaning solution if necessary.
2. Gather the necessary materials: You will need painter’s tape, a pair of scissors, and a clean, flat surface to work on.
3. Measure and cut the painter’s tape: Start by measuring the length of tape you will need to cover the area around the knot holes, voids, or knots. Cut the tape to the appropriate length using a pair of scissors.
4. Apply the painter’s tape: Carefully position the tape around the outer edges of the knot holes, voids, or knots, ensuring that it completely covers the surrounding wood surface. Press down firmly on the edges of the tape to ensure it adheres securely.
5. Seal the edges of the tape: Once the painter’s tape is applied, take extra care to seal the edges of the tape to prevent any leakage during the filling process. Use your fingers or a flat tool to firmly press down on the edges of the tape, creating a tight seal.
By properly taping off the area surrounding the knot holes, voids, or knots, you create a protected workspace that allows for precise and controlled filling. This step is essential to achieve a neat and professional-looking finish.
Benefits Of Taping: Seal The Edges Of The Painter’s Tape To Prevent Leakage And Ensure A Neat Finish.
Taping off the area surrounding the knot holes, voids, or knots offers several benefits that contribute to a successful wood filling project. Here are some advantages of this step:
1. Leakage prevention: By sealing the edges of the painter’s tape, you minimize the risk of epoxy resin leaking onto the surrounding wood surface. This helps maintain a clean and tidy workspace, reducing the need for extra cleanup and ensuring a professional finish.
2. Controlled filling: Taping off the area allows you to have greater control over the filling process. It creates a clear boundary, preventing the epoxy resin from spreading beyond the designated area. This ensures that the knot holes, voids, or knots are filled accurately, resulting in a smooth and even surface.
3. Neater finish: The sealed edges of the painter’s tape create clean lines and sharp edges around the knot holes, voids, or knots. This contributes to a neater and more polished overall appearance.
4. Time-saving: By taping off the area before filling the knot holes, voids, or knots, you save time on cleanup and rework. The tape acts as a protective barrier, ensuring that the epoxy resin only goes where it’s intended, eliminating the need for excessive sanding or refinishing.
In conclusion, taping off the area surrounding the knot holes, voids, or knots is a crucial step in filling wood knots. It offers benefits such as preventing leakage, providing controlled filling, achieving a neater finish, and saving time. By following the proper instructions and taking the time to tape off the area, you set yourself up for a successful knot filling project.
Using Epoxy Resin For Filling Knot Holes
Learn how to fill knot holes in wood using epoxy resin. Start by taping off the area around the holes, voids, or knots, and then mix a small amount of epoxy resin to fill the knot. This method ensures a seamless and durable finish.
If you’re a woodworker or DIY enthusiast, you know that knot holes can be a challenge when it comes to achieving a smooth, flawless finish on your projects. But fear not, there is a solution – epoxy resin. This versatile and durable material can be used to fill knot holes in wood, providing a seamless and long-lasting solution. In this article, we will guide you through the process of using epoxy resin to fill knot holes, step-by-step. We will also discuss the advantages of using epoxy resin for filling larger knot holes, ensuring your woodwork projects look their best.
Step-by-step Instructions: Mix Small Amounts Of Epoxy Resin And Apply It To The Knot Holes, Allowing It To Self-level
- Tape off the area around the knot holes using painter’s tape to create a clean edge.
- Mix small amounts of epoxy resin according to the manufacturer’s instructions in a separate cup or dish.
- Using a small applicator or brush, carefully apply the epoxy resin to the knot holes, filling them completely.
- Allow the epoxy resin to self-level, ensuring a smooth and even surface.
- Leave the epoxy resin to cure according to the manufacturer’s instructions.
- Once the epoxy resin has fully cured, remove the painter’s tape and sand the filled knot holes to achieve a seamless finish.
- Finish the wood as desired, such as staining or painting, to complete the project.
Advantages Of Epoxy Resin: Provides A Durable And Seamless Filling, Ideal For Larger Knot Holes
Epoxy resin offers several advantages when it comes to filling knot holes in wood, particularly for larger ones. Here are some key benefits:
- Durability: Epoxy resin is a durable material that can withstand wear and tear, making it ideal for filling knot holes that may be exposed to everyday use.
- Seamless finish: Epoxy resin naturally self-levels, creating a smooth and seamless surface that blends seamlessly with the surrounding wood.
- Customizable: Epoxy resin can be tinted or colored to match the wood or create contrasting effects, allowing for customized finishes.
- Easy to work with: Epoxy resin is easy to mix and apply, making it suitable for both beginners and experienced woodworkers.
- Long-lasting: Once properly cured, epoxy resin forms a strong bond with the wood, providing a long-lasting solution for filling knot holes.
By utilizing epoxy resin to fill knot holes in wood, you can achieve a professional and flawless finish on your woodworking projects. Whether you’re working on furniture, cabinetry, or other wooden items, epoxy resin provides a durable and seamless solution that will enhance the overall appearance and longevity of your creations.
Alternative Filling Options
When it comes to filling knot holes in wood, there are several alternative options available to achieve a smooth and even surface. In this section, we will explore two popular methods for filling smaller knot holes: tinting epoxy resin and wood putty application.
Tinting Epoxy Resin: Learn How To Tint Epoxy Resin For Filling Knot Holes, Allowing For Customized Finishes.
If you want to add a touch of color to your knot-filled wood projects, tinting epoxy resin is an excellent option. Follow these steps to achieve customized finishes:
- Start by gathering the following materials: epoxy resin, tinting agent, mixing cups, stirring sticks, and a brush.
- Clean the knot hole thoroughly, ensuring that it is free from any debris or dust.
- Mix a small amount of epoxy resin in a mixing cup according to the manufacturer’s instructions.
- Add the tinting agent to the resin, starting with a small amount. Mix well until the desired color is achieved.
- Using a brush, carefully apply the tinted epoxy resin to the knot hole. Make sure to fill the hole completely and level it with the surrounding wood surface.
- Allow the epoxy resin to cure according to the manufacturer’s instructions.
- Once cured, sand the filled knot hole gently until it is smooth and blends seamlessly with the wood.
Wood Putty Application: Clean The Hole And Apply Wood Putty To Fill Smaller Knot Holes, Ensuring A Smooth And Even Surface.
Wood putty is another popular option for filling smaller knot holes in wood. Follow these steps for effective wood putty application:
- Start by cleaning the knot hole, removing any debris or dust.
- If needed, deepen the hole slightly using a chisel to ensure that the putty fills it entirely.
- Select a wood putty that matches the color of the surrounding wood.
- Take a small amount of wood putty and press it into the knot hole using a putty knife.
- Ensure that the putty is evenly distributed and fills the hole completely.
- Once the putty is dry, sand the area gently until the surface is smooth and blends seamlessly with the wood.
By following these alternative filling options, you can easily fill knot holes in wood and achieve a smooth, professional finish. Whether you choose to tint epoxy resin for customized finishes or use wood putty for a seamless surface, these methods will help you enhance the appearance of your wood projects.
Best Practices For Knot Hole Filling
When it comes to filling knot holes in wood, there are certain best practices that you should follow to ensure a seamless and professional-looking finish. In this section, we will discuss the three main steps involved in knot hole filling: removing debris, sanding and finishing, and comparing different fillers.
Removing Debris
A crucial first step in knot hole filling is to thoroughly clean the knot holes from any debris or loose materials before applying fillers. This ensures that the fillers can adhere properly to the wood and provide a strong bond. To remove debris, you can use a wire brush or a small chisel to gently scrape away any dirt, sawdust, or loose wood fibers from the knot holes. Be sure to clean the surrounding area as well to create a clean and smooth surface for filling. Once the debris is removed, use a vacuum or a damp cloth to clean any remaining dust or particles.
Sanding And Finishing
After the filler has dried, it is important to sand the surface to ensure a seamless and polished look. Start by using a medium-grit sandpaper to sand down the filled knot holes and the surrounding area. Use gentle and even strokes to create a smooth surface. Gradually switch to a finer grit sandpaper to achieve a smoother finish. Be sure to remove any excess filler during the sanding process, and pay extra attention to the edges of the filled knot holes to ensure a flush and uniform appearance. Once the sanding is complete, wipe away any dust with a damp cloth and let the wood dry completely before moving on to the finishing step.
Comparing Fillers
When it comes to choosing the right filler for knot holes, there are several options available, each with its own pros and cons. Here are the three most common fillers used in knot hole filling:
- Wood Filler: Wood filler is a popular choice for filling smaller knot holes. It is easy to use and can be tinted to match the color of the wood. However, it may shrink over time and may not be as durable as other fillers.
- Epoxy: Epoxy is a versatile and durable filler that can be used for both small and large knot holes. It provides a strong bond and can be tinted or mixed with sawdust to match the wood color. However, it requires careful mixing and may have a longer curing time.
- Glue with Sawdust: This DIY filler involves mixing wood glue with sawdust to create a paste-like consistency. It is a cost-effective option and can be easily customized to match the wood color. However, it may not be as strong or long-lasting as other fillers.
Before choosing a filler, consider the size and depth of the knot holes, the desired finish, and the level of durability required. Each filler has its own advantages and disadvantages, so weigh them carefully to make an informed decision.
Frequently Asked Questions On How To Fill Knot Holes In Wood
What Is The Best Filler For Knots?
The best filler for knots in wood is epoxy resin. It can be mixed and applied to fill the knot, providing a seamless and durable solution. Epoxy resin dries quickly, does not require mixing or preparation, and can be tinted to match the wood color.
It is a popular choice among woodworkers for filling knots in wood.
How Do You Fill A Knot Hole In A Wooden Shed?
To fill a knot hole in a wooden shed, start by taping off the area around the hole. Mix epoxy resin in a small cup and then scoop it into the knot. Let it self-level and dry. For larger holes, use tinted epoxy or wood putty.
Sand the area afterward for a seamless finish.
How Do You Stabilize Wood Knots?
To stabilize wood knots, follow these steps: 1. Tape off the area around the knots. 2. Mix epoxy resin and apply it to the knots. 3. For larger knots, use tinted epoxy or coffee grounds. 4. Let it self-level and dry.
5. Sand it smooth. Remember to use a small cup or dish for mixing and apply painter’s tape for clean edges. #woodworkingtips
How Do You Fill A Hole In A Knotty Pine?
To fill a hole in knotty pine, follow these steps: 1. Clean the hole of debris and tape off the surrounding area. 2. Mix a small amount of two-part epoxy and add a filler if necessary. 3. Apply the epoxy mixture to the hole, ensuring it bonds well.
4. For a natural look, use a dark filler to make the knots appear black. 5. Allow the epoxy to dry and then sand the surface for a seamless finish.
Conclusion
To conclude, filling knot holes in wood can be easily done with the right techniques and materials. Taping off the area around the holes and using wood putty or epoxy resin are effective methods for achieving seamless results. Whether you’re working on a small project or filling larger knot holes, there are various options available.
Consider the pros and cons of different fillers, such as wood putty, epoxy, or glue with sawdust, to choose the best one for your needs. Ultimately, filling knot holes not only enhances the appearance of wood but also ensures its durability and longevity.

